
Cabinet Painting Sacramento can be a bit trickier than regular interior painting. Whether you’re using a sprayer or brushes, special considerations must be taken into account to ensure your client is happy with the results.
 Begin by labeling cabinet doors and drawer fronts. This will help you keep track of them as you remove them and reassemble the cabinets.
Painting cabinets is a task that requires skill, patience, and the right preparation products. Whether you’re a professional or a DIYer, using the correct tools and equipment, while wearing proper safety gear like eye protection and respirators will help you avoid common mistakes that can ruin your project and yield substandard results.
First, it’s essential to thoroughly clean your cabinet surfaces. This step removes any dirt, grease or other debris that will prevent the paint from bonding with the surface and helps ensure a clean, smooth base for your new coat of paint. Depending on the type of paint you are using, degreasers, liquid deglossers or even a bit of TSP (trisodium phosphate) can be used to get your surfaces clean and ready for the next steps.
Once your surfaces are clean, you should lightly sand your cabinetry to roughen the factory finish and give the surface a more consistent texture. Use a hand-held sander or a power sander with fine-grit sandpaper to make sure you’re removing all the loose bits of previous coatings. This will also help to hide minor imperfections and give you a nice, smooth finish for your final coat of paint. After sanding, always wipe all surfaces down with a damp rag or tack cloth to remove any dust particles that could mar your finished product.
Choosing the correct primer is another important part of your cabinet painting prep. Wood surfaces are very porous and need a good, quality primer to help the paint adhere. For the best results, use an oil-based primer that can withstand moisture and tannin. Zinsser Cover Stain Low VOC-Classic Oil Primer and McCormick uniX Multi-Purpose Stain Blocking Primer 06460 are both excellent options for this purpose.
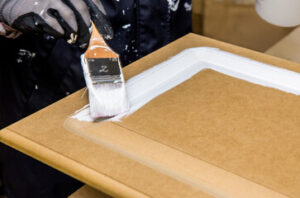
The next step is to apply your chosen primer/sealer and allow it to dry completely. It takes up to a week for the paint to cure completely, so be sure to take your time and apply coats of primer/sealer evenly and allow them plenty of time to dry between each application. Once the primer/sealer is dry, you can begin applying your topcoat of paint.
Primer
Refinishing cabinetry can transform a kitchen, but it’s important to remember that painting cabinets is more than just slapping on a new color. It takes a lot of time to do it correctly. Proper preparation is crucial; removing hardware and masking off surfaces to be kept safe from paint fumes, washing all doors and drawer fronts, light sanding to create a smooth surface for primer and paint, and ensuring that the proper tools are used (such as a respirator). With thorough attention to detail at every step of the process from disassembly through reinstallation, you’ll have a professional look that lasts.
The first layer of primer is key to a long-lasting, high-quality finish. When wood is painted without a primer, it tends to show the scratches, pores, and uneven texture of the grain. Primer fills these imperfections and creates a smooth, even surface that paint will adhere to. The right type of primer depends on the material your cabinets are made from: wood, polyurethane, or melamine. We use a high-quality water-based Cabinets primer that dries quickly and is easy to clean off brushes, while also containing a mildew-resisting formula.
When it comes to the sanding process, it’s best to leave this to professionals who are experienced with this task and can provide quality results without damaging the wood or causing warping. This is especially important if you are repainting over existing stain or paint. A light sanding can remove any rough spots, and it also provides a “tooth” for the next coat of paint to adhere.
After sanding, each cabinet door and drawer front is lightly wiped down to remove any grease or oils that may have built up over time. If left on, these can bleed through the primer and paint layers, creating a patchy or blotchy finish. A commercial degreaser is the best choice for this step, but Krud Kutter or TSP can work just as well.
When it’s dry, you can start to see the difference that a good primer makes. It can make the difference between a great paint job that will last years or a mediocre job that needs touch-ups within months. It’s a small investment in the beginning that can save you the headache and expense of costly touch-ups down the road.
Paint
Cabinet painting requires specialized tools and techniques. Professional painters know how to properly clean and sand surfaces, how to use quality products designed for cabinets, how to apply multiple coats with drying times in between and how to avoid common pitfalls that can result in a subpar finish.
Surface prep is the most critical factor when it comes to ensuring a beautiful, long-lasting finish on painted cabinetry. If this step is not done correctly, adhesion will be compromised and the new paint will chip, peel or bubble. This can mean costly repairs and rework for the homeowner.
After a thorough cleaning and sanding, the cabinet surfaces should be primed. There are many primers on the market, but one that is highly recommended for this type of project is Extreme Bond Primer. This product offers excellent adhesion and coverage for a smooth finish that is stain-resistant. It is important to let the primer dry at least 24 hours before sanding with a very fine grit sandpaper. Once the primer is completely sanded, a second coat of primer should be applied and allowed to dry again.
Once the primer has dried, it’s time to start painting! A high-quality acrylic interior/exterior paint is ideal for cabinetry. It dries to a factory-smooth, wipeable finish and will resist moisture, stains and scratches much longer than traditional oil-based paint. It is also available in a wide variety of colors and is low VOC, which makes it safe for indoor use.
A quality brush is also a must for this type of project. There are a variety of brushes on the market, but many pro painters use square-cut brushes that range in size from three to four inches. These brushes give greater precision for the nooks and crannies of most cabinet doors and can help minimize brush marks and uneven coverage.
Once the cabinetry is painted, the hardware can be reinstalled and any additional details such as decorative molding or trim can be added for a finished look. For a simple finishing touch, metallic spray paint is a quick way to update worn knobs and handles.
Finish
After your paint job is complete, you can add the final touches that really bring your cabinets together. Depending on the color and finish you chose, this could include hardware or knobs and pulls for your cabinet doors and drawer fronts to make them pop. You can also use a polycrylic sealer to protect your newly painted cabinets and keep them looking good for years to come.
You can apply these products with a sprayer or paintbrush, although using a sprayer is preferred because it creates thin, even coats and eliminates roller texture. It also reduces the time needed for each coat and requires less dry time between coats.
If you choose to use a sprayer, it is important to follow all manufacturer’s instructions for proper use. Also, be sure to wear a respirator during application and remove dust with a tack cloth or rag.
When selecting the product to apply to your cabinets, consider your budget, the level of durability you require, and any special features you might want such as anti-fingerprint or moisture resistance. A popular choice is latex paint, which dries quickly, cleans up easily, and emits low odor during application. It’s available in a wide variety of colors and is ideal for flat doors, but it may not be as durable as enamel options or other professional-grade finishes.
Many homeowners opt for a custom paint finish that mimics natural materials like wood grain or stone textures for an added touch of personality and uniqueness. Low-VOC and zero-VOC options are also becoming more common, making them a great option for homeowners who are concerned about environmental impacts.
Once your cabinet painting is complete, it’s important to allow the surfaces to fully cure for about two weeks before reinstalling any cabinet doors or drawer fronts. In addition, it’s essential to mark where each door or drawer belongs so they can be reinstalled in the correct place. We recommend putting the old hardware in a plastic bag and labeling it with a piece of tape to prevent confusion when you are ready to reinstall it.